

Sash Window Sill Repair: Rot, Splices and Full Replacement
If one part of a sash window is going to rot first, it will be the sill. It catches everything the weather throws at the window — rain off the glass, splash-back from the brickwork — and it is near enough horizontal, so water lingers long after the rest of the window has dried. On most sash windows we survey around Cambridge, the sill decides whether the window needs an afternoon’s attention or a proper joinery repair.
The good news is that a rotten sill almost never means a new window. The sill is one component of the box frame, with a well-established ladder of repairs: repaint if caught early, epoxy-fill localised soft spots, splice in new timber where decay is more extensive, or replace the whole sill where it is past saving. Even the top rung costs a fraction of replacing a window that is otherwise sound.
This guide covers how a sash sill works, why it rots, how to judge the damage honestly, what each repair involves — and the mistakes we are most often called in to put right.
What the sill actually does
The sill — spelt cill just as often in joinery catalogues and on architects’ drawings; both are correct — is the bottom horizontal member of the box frame. The whole weight of the window bears on it, the bottom sash closes down onto it, and it forms the junction between the timber window and the masonry below.
Two details of its design do most of the work, and both are routinely ruined by careless maintenance:
- The weathered top face. A properly made sill is not flat on top. It slopes down and away from the window — the joiner’s term is weathering — so rainwater runs off the front edge instead of pooling against the sash’s bottom rail. Decades of paint build-up, or a repair finished flat, can level that slope out and leave water standing exactly where it does the most harm.
- The drip groove. A small channel runs along the underside of the sill, near the front edge. It breaks the surface tension of water curling around the sill’s nose, forcing it to drip off rather than track back to the brickwork. When the groove is bridged — painted solid, or smeared with sealant — water follows the underside straight to the wall, giving damp staining below the window and rot starting where nobody can see it.
Because it works this hard, the sill takes more punishment than any other part of the window.
Why sills rot
Timber does not rot because it is old — plenty of Victorian sills around Cambridge are still original. Rot needs sustained moisture, and it usually gets in through one of these routes:
- Standing water on a worn surface. Once the weathered slope has been flattened by paint layers or wear, every shower leaves a puddle sitting on the sill for hours.
- A failed paint film and open joints. Cracked or flaking paint lets water into the timber and then holds it there. Open joints where the sill meets the jambs do the same at the most vulnerable point.
- Exposed end grain. Timber drinks through end grain far faster than through its face; sill ends and any unprimed cut wick water deep into the section.
- Condensation inside. Moisture condensing on single glazing in winter runs down and collects along the inside of the bottom rail and sill, rotting windows from the room side.
- Planters and pots. Anything sat on a sill traps a permanently damp patch beneath it. We can often tell where the flower pot lived from the shape of the rot.
- A blocked drip groove. Water tracks under the sill to the wall and the timber sits on damp masonry, decaying from the underside up.
Wet rot or dry rot?
Almost all sill decay is wet rot — fungal decay of timber that stays persistently wet. It is localised: it stops where the moisture stops, which is why it can be cut out and repaired with confidence. The timber darkens, softens and cracks along the grain, and paint over it lifts or feels papery.
Dry rot is a different and far more serious organism. It is rarer, but it can spread through masonry well beyond the damp timber it started in, and it shows as deep cuboidal cracking, grey cotton-wool-like growth and a distinctive mushroom smell. If you see anything resembling spreading fungal strands behind a sill, stop and get a professional survey before anyone starts cutting — dry rot needs its full extent traced and treated.
Assessing the damage
Paint hides a great deal, so never judge a sill by eye alone — probe it.
- Take a bradawl or a slim flat-head screwdriver and press it firmly into the sill at intervals — top face, front edge and, where you can reach, the underside. Sound timber resists and takes only a shallow mark; rotten timber feels soft or spongy and lets the point sink in with little pressure.
- Work outwards from any soft spot to map its edges. Rot runs along the grain, so decay routinely extends well past what the surface shows — a blistered patch the size of your palm often sits over softness twice that length.
- Look for the supporting evidence: flaking or bubbled paint, open joints at the sill ends, and cracking across the grain into rough cubes, which means decayed fibres beneath.
- Check the neighbours. Rot travels through joints, so probe the jamb feet where they meet the sill, and the bottom rail of the lower sash — a repair that ignores soft jamb feet fails from the sides. A swollen bottom rail also explains a sash that sticks; see our guide to freeing stuck sash windows.
Once you know how far the decay runs, you can pick the right rung on the repair ladder — and no higher.
The repair ladder, cheapest first
Sill repairs run from an afternoon’s decorating to a full joinery replacement. The honest approach is to match the repair to the damage, not to the most profitable job on the list.
| What you find | Appropriate repair | Typical scope |
|---|---|---|
| Paint failing but timber sound when probed | Dry out, strip back, prime and repaint | Decorating only — no timberwork |
| Localised soft patches, structure intact | Cut out and repair with a two-part epoxy system | Small excavations, filled and reshaped |
| Decay through a section of the sill’s depth or length | Splice (scarf) repair — new timber let in | Section of sill cut out and replaced |
| Rot through most of the sill; frame dropping; more filler than wood | Full sill replacement | New sill machined and fitted; box retained |
Caught early: dry, strip, prime, repaint
If the probe finds sound timber everywhere and the problem is only a tired paint film, the repair is decorating done properly. Let the sill dry thoroughly — bare timber painted damp will blister within months — then scrape and sand loose paint back to a firm edge, restore the weathered slope if paint build-up has flattened it, spot-prime bare wood and repaint. Rake out and reseal open joints at the sill ends before the paint goes on.
Epoxy and resin repairs: for localised patches
Where soft spots are genuinely localised, a two-part epoxy repair system is a legitimate, long-lasting fix — not the same thing as pressing decorator’s filler into a hole.
- Cut out all soft timber back to wood that resists the probe, with a chisel or rotary cutter, undercutting slightly so the repair keys in. Be more ruthless than feels natural; rot left behind under filler carries on regardless.
- Let the excavation dry right out.
- Flood the exposed fibres with the system’s liquid consolidant (sometimes sold as a stabiliser or hardener), which soaks in and firms up the surface the filler bonds to. Check the manufacturer’s data sheet for soak-in and curing times rather than guessing.
- Mix the two-part high-build wood filler and shape it proud of the surface; once cured, plane and sand it back to the original weathered profile — slope and all. Work through the grits, roughly 80 then 120 then 180, until the repair disappears under your hand.
- Re-form the drip groove through the repair if it crossed one, then prime and paint.
Epoxy is the right call for patches — a decayed corner, a pocket around a failed knot, damage at a joint. A sill soft along half its length does not need a bigger bucket of filler; it needs timber.
Splice repairs: cutting out and letting in new timber
A splice — or scarf — repair replaces the decayed section of the sill with new wood while keeping everything sound. Done well, it is invisible under paint and as strong as the original. The sequence matters:
- Mark out beyond the mapped decay and cut the rotten section away back to demonstrably sound timber, making the cuts on a slope rather than square so the finished joints shed water outwards instead of offering it a seam to sit in.
- Cut the new piece to match — compatible species, same section, same weathered profile — and dry-fit it until the joints close up tight.
- Prime all faces of the new piece before it goes in, especially the end grain at the joints. Once fitted, those faces are buried forever; unprimed, they are where the next rot starts.
- Glue with an exterior-grade structural adhesive and screw, with the fixings set below the surface and plugged or filled.
- Re-form the drip groove through the new section so it runs continuously, dress the joints flush, then fill hairline seams, sand, prime and paint.
Full sill replacement: a joinery job, not a filler job
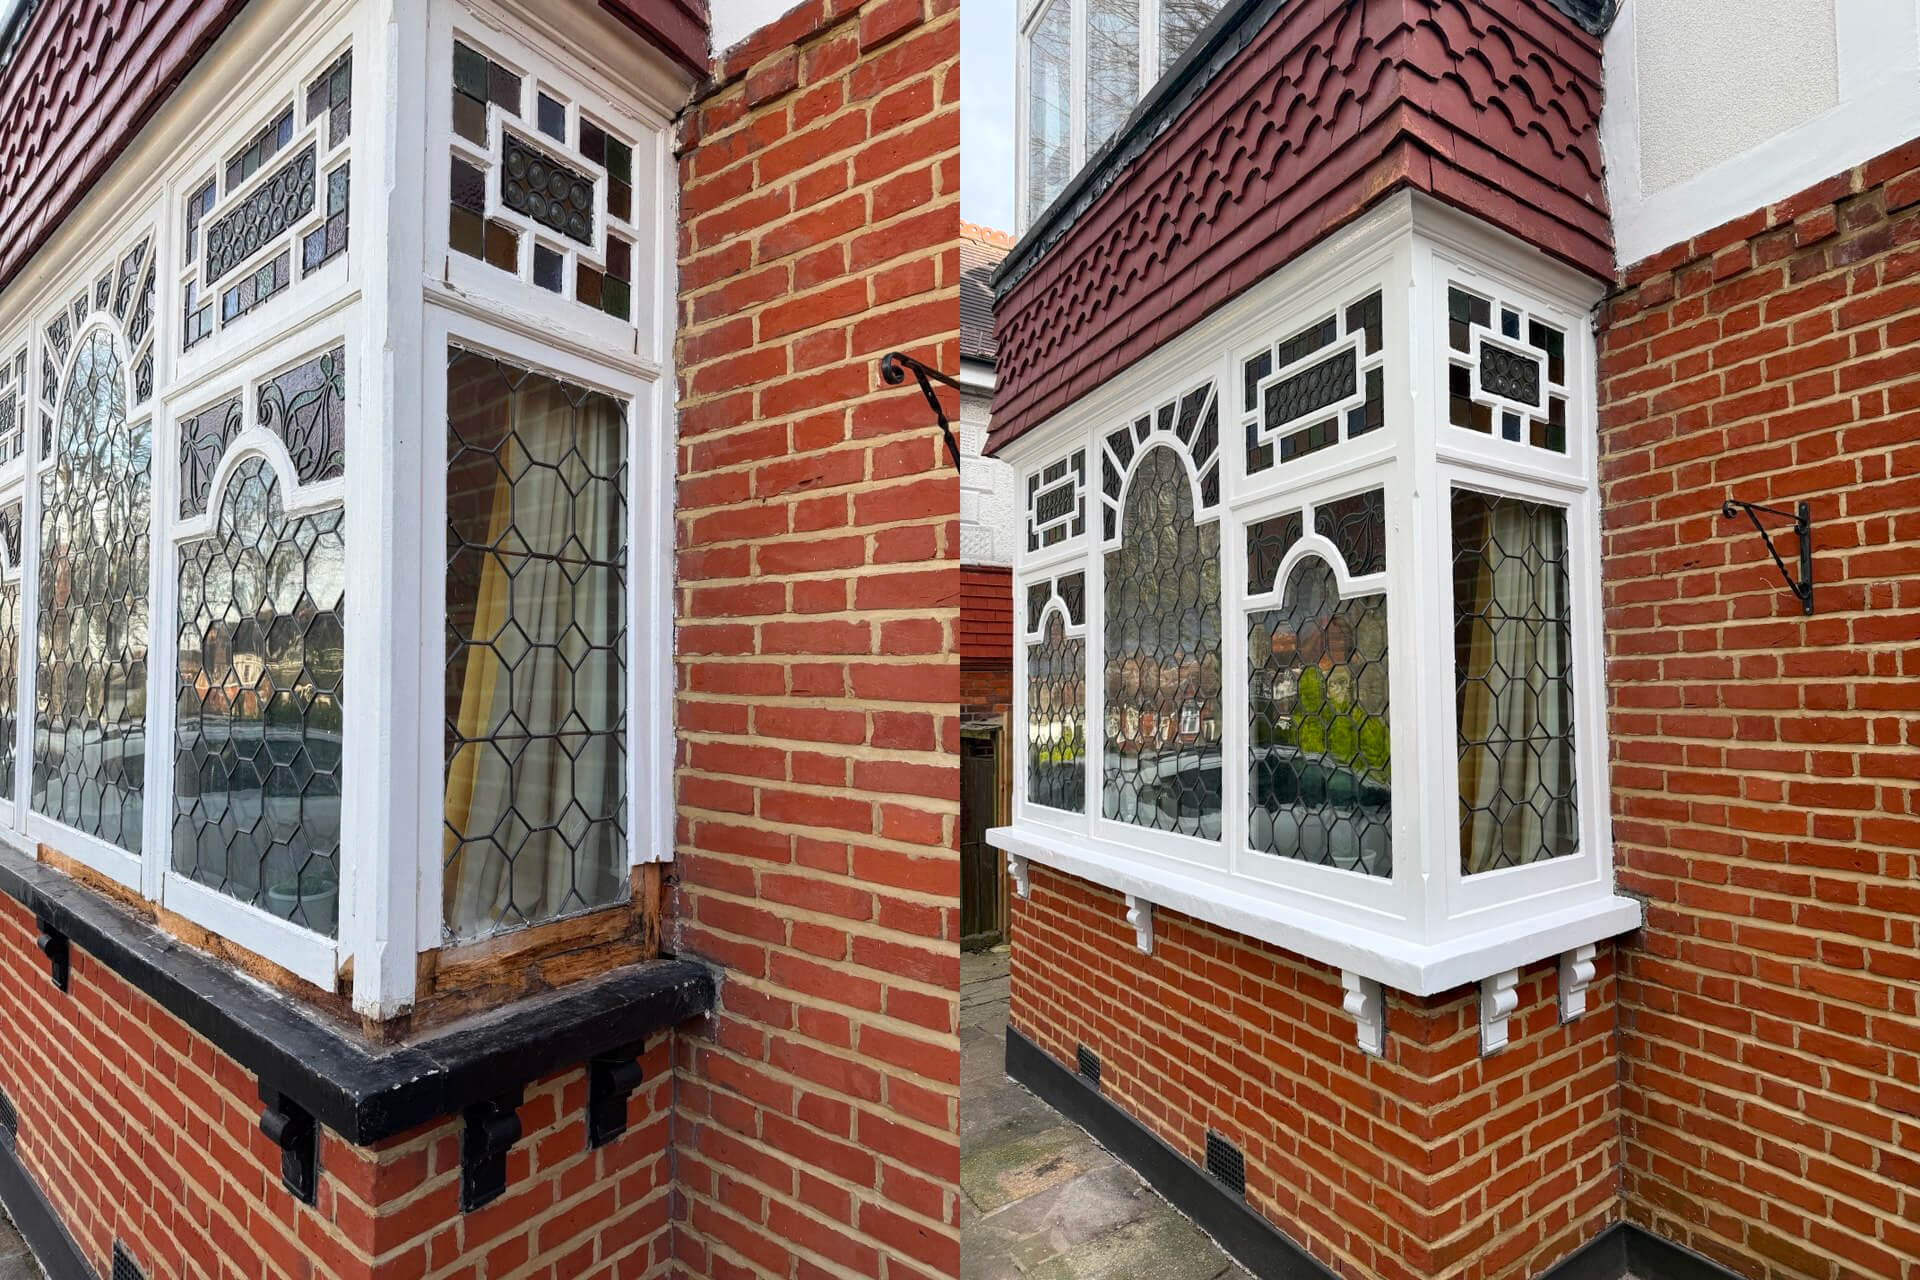
When the probe tells you the sill is gone — decay through most of its run, the box beginning to settle, or filler repairs that have left little original wood — replacement is the honest repair. The window itself still does not need to go anywhere.
The frame is supported so nothing moves while the sill is out. The old sill is cut free in sections, and the jamb feet are trimmed or spliced back to sound timber. The new sill is machined to match the original — full weathered slope, drip groove, the rebate the bottom sash closes onto — primed on every face, then let in under the frame, fixed, and bedded and pointed against the masonry so the junction sheds water rather than trapping it.
This is bench-and-site joinery: accurate measurement, matched profiles, proper support. Anyone proposing to solve a structurally failed sill with buckets of filler is at the wrong rung of the ladder.
Choosing timber for the repair
The repair only lasts as long as the wood it is made from. For splices and new sills we specify:
- Slow-grown European redwood — tight growth rings, takes paint well, and a good match for most Victorian and Edwardian joinery.
- Douglas fir — stable and naturally more durable, a sensible step up for exposed elevations.
- European oak — very durable and right where the original sill was oak, though it needs the correct fixings and finishes.
- Modified timber such as Accoya — treated to resist moisture movement and decay; the choice where maximum service life matters more than matching species.
Whatever the species, two rules hold. The new piece must be machined to the original section and profile — a flat board planted where a weathered sill should be is simply a water trap. And every face gets primed, with the end grain sealed, before installation, not after.
Decorating after the repair
Paint is the sill’s only defence once the joinery is done: spot-prime all bare timber and repairs, undercoat, then two exterior top coats, taking the paint slightly over arrises and edges rather than stopping short. Never let paint — or worse, sealant — bridge the drip groove; run a blade along it after painting if it has started to close up. For the full discussion of paint systems, see our guide to the best paint for wooden windows.
One safety note before any sanding starts. If the house was painted before 1992 — which covers most period property — the old layers may contain lead: lead paint was prohibited in the UK in February 1992, and lead pigments were common up to the 1960s. The hazard is dry sanding, which turns the old film into breathable dust. Use a chemical stripper, wet abrasive paper or dust-extracted sanding equipment, and wear an FFP3 mask.
Interior sills, condensation and mould
Black mould along the inside face of a sill is usually a symptom of the room, not the window. Warm indoor air condenses on the cold glass, and the water runs down and sits where glass meets timber. The routine fix is housekeeping: wipe the sill and the bottom of the glass down in the cold months, keep trickle vents or a window slightly open where practical, and avoid drying laundry in an unventilated room.
Mould that keeps returning in the same place after cleaning deserves a closer look. It can mean a failed seal letting rainwater in around the glass or frame — our glass replacement work often starts from exactly this symptom — or a deeper damp problem in the wall below, which is worth a proper survey rather than another round of mould spray.
Preventing the next repair
Sills fail slowly and give years of warning if you look. A simple routine keeps most of them out of trouble:
- Wash sills down once a year and probe anywhere the paint looks tired — a five-minute inspection per window.
- Run a finger, or a blade, along the drip groove and clear anything bridging it.
- Deal with blistering paint promptly, while it is a decorating job rather than a timber job.
- Keep planters, pots and anything else off the sills.
- Repaint exposed elevations — south- and west-facing, and anything catching driven rain — more often than sheltered ones.
Common mistakes we get called in to put right
- Filler over damp or rotten timber. The most common by far. The filler cures, the trapped moisture keeps working, and the repair pops out within a season — with the rot further advanced underneath.
- Sealant smeared over the drip groove. Done in good faith, it re-routes water along the underside to the wall and turns a dry sill into a damp one.
- Painting a wet sill. Paint over damp timber blisters quickly and seals the moisture in. Repaints belong in a dry spell, on timber that has dried through.
- Flattening the weathered slope. Repairs finished level, or decades of paint build-up, leave water standing where the joiner designed it to run off.
- Replacing the whole window for a failed sill. If the box, sashes and joinery above are sound, replacing the window to cure a sill is like re-roofing to cure a slipped slate.
- Fixing the rot but not the water. Every rotten sill has a cause — a blocked groove, a leaking gutter, a failed joint. Repair the timber without curing the moisture route and the same repair comes round again.
If you are unsure which rung your sills are on, an honest survey settles it quickly — and there are more general answers on our FAQ page.
Frequently asked questions
How do you repair a rotten window sill?
Cut out all soft, decayed timber back to sound wood, let it dry, then repair with a two-part epoxy wood filler for small patches or a spliced-in section of new timber for anything larger. Shape the repair to the original sloping profile, re-form the drip groove if affected, then prime and repaint. Filler over damp or rotten wood fails within a season.
Can you replace a sill without replacing the whole window?
Yes, in most cases. The sill is a separate piece of timber at the bottom of the box frame, so a joiner can support the frame, cut the old sill out and fit a new one machined to the same profile. The sashes, pulleys and the rest of the box stay as they are. Replacing a whole window for a rotten sill is nearly always unnecessary.
What is the sill on a sash window?
The sill is the bottom horizontal member of the box frame — the piece of timber the whole window sits on. Its top face slopes outwards to shed rainwater, and its underside has a drip groove that stops water tracking back to the brickwork. It is spelt both sill and cill in the trade; they mean the same thing.
When is a sill beyond repair?
When rot runs through most of its length or depth, when the timber has lost its structural integrity so the frame above has started to drop, or when previous repairs have left more filler than wood. At that point a splice would join new timber to compromised material, and a full sill replacement in durable timber is the honest answer.
How do I get rid of mould on window sills?
Wipe the sill down with a household mould cleaner or diluted white vinegar, dry it thoroughly, then deal with the cause — almost always condensation. Improve ventilation, keep trickle vents open and wipe standing moisture off the glass in winter. If mould keeps returning in one spot, check for a failed paint seal or a deeper damp problem.
How do you repaint a window sill?
Wash the sill, scrape off loose paint, sand to a sound feathered edge and spot-prime any bare timber. Follow with an undercoat and two exterior top coats, keeping the drip groove free of paint. If the house predates 1992 the old paint may contain lead, so avoid dry sanding — use a chemical stripper or wet abrasive and wear an FFP3 mask.
How is a full sill replacement done?
The box frame is supported, the old sill is cut out in sections, and the jamb feet are trimmed back to sound timber. A new sill — machined to the original profile with the weathered slope and drip groove — is primed on all faces, let in under the frame, fixed, then bedded and sealed against the masonry. It is a joinery job, not a filler job.